Installation
You can install ncclient in several ways:
| Method | Best for |
|---|
| Docker | The first lighthouse in a network, to also run Magic DNS |
| Binaries | Prebuilt CLI binaries from the Web UI or GitHub Releases |
| Linux Desktop App | Linux: GTK4 app + background service via .deb, .rpm, or Flatpak |
| Windows Installer | Windows: CLI, native app, and background service via one MSI |
| NixOS | NixOS hosts: a declarative services.ncclient module |
| Pip (PyPI) | Fallback when none of the above are suitable |
Choose one and follow the linked page. Then see Usage to enroll the device and start the daemon (or service).
1 - Docker
The Docker client is the preferred method for the first lighthouse in a network so the container can run dnsmasq and you can use Magic DNS (split-horizon DNS) for the network. Other devices (CLI, a native GUI app, or additional Docker clients) can then resolve Nebula hostnames via the lighthouse.
Image: ghcr.io/nixrtr/nebula-commander-ncclient:latest, or build from the repo client/docker (Dockerfile in that directory).
Required environment:
NEBULA_COMMANDER_SERVER – Base URL of your Nebula Commander backend (e.g. https://nc.example.com), no trailing slash.
Optional environment:
ENROLL_CODE – One-time enrollment code from the Nebula Commander UI (Nodes → Enroll for the node). Only used when the token file does not exist; after enrollment the token is stored and this is ignored.SERVE_DNS – Set to "true" to run dnsmasq on this node when it is a lighthouse, so the network can use Magic DNS. Omit or set to false if this node is not a lighthouse or you do not need DNS.NEBULA_DNS_POLL_INTERVAL – Seconds between dnsmasq config polls when this node is a lighthouse (default: 60).NEBULA_OUTPUT_DIR – Directory where ncclient writes Nebula config and certs inside the container (default: /data/nebula).NEBULA_DEVICE_TOKEN_FILE – Path to the device token file (default: /data/nebula-commander/token).
Use a persistent volume for /data so the token and Nebula config/certs survive restarts. The compose file uses network_mode: host so Nebula and dnsmasq can bind to the host.
Example (docker-compose):
services:
  ncclient:
    image: ghcr.io/nixrtr/nebula-commander-ncclient:latest
    network_mode: host
    restart: unless-stopped
    environment:
      NEBULA_COMMANDER_SERVER: "https://nc.example.com"
      ENROLL_CODE: "XXXXXXXX"   # one-time, from UI
      SERVE_DNS: "true"         # for first lighthouse + Magic DNS
    volumes:
      - ncclient-data:/data

volumes:
  ncclient-data:
    driver: local
Steps:
- In Nebula Commander, create a network and add a node for this device. Mark it as a lighthouse if this will be the first lighthouse and you want Magic DNS.
- Create or sign a certificate for the node, then click Enroll and copy the one-time code.
- Set
NEBULA_COMMANDER_SERVER and ENROLL_CODE (and SERVE_DNS: "true" for the first lighthouse), then start the container. - After enrollment, the container fetches config and certs and runs Nebula (and dnsmasq if
SERVE_DNS is set and the node is a lighthouse).
2 - Binaries
If Docker is not an option, use binaries from the Web UI or GitHub Releases.
From Web UI
When your Nebula Commander instance is deployed with client binaries included (for example the frontend image built with DOWNLOAD_BINARIES=1), the Web UI can serve them.
- Open your Nebula Commander URL in a browser and log in.
- Go to the downloads or client section (or open
https://YOUR_SERVER/downloads/ if your instance serves that path). - Download the binary for your platform:
- Linux x86_64:
ncclient-linux-amd64 - Linux ARM64:
ncclient-linux-arm64 - Windows x86_64:
ncclient-windows-amd64.exe - macOS Intel:
ncclient-macos-amd64 - macOS Apple Silicon:
ncclient-macos-arm64
- Place the file in a directory on your PATH (or add that directory to PATH). On Linux and macOS, make it executable:
chmod +x ncclient-linux-amd64 (or the file you downloaded).
If your instance does not serve binaries, use From releases or Pip (PyPI) instead.
From releases
Pre-built binaries are attached to GitHub Releases for each version.
- Open the releases page and choose a version (e.g. the latest).
- Download the file for your platform (same names as in From Web UI).
- Optionally verify with
SHA256SUMS.txt in the same release. - Place the binary in a directory on your PATH (or add that directory to PATH). On Linux and macOS, make it executable:
chmod +x ncclient-linux-amd64 (or the file you downloaded).
3 - Linux Desktop App
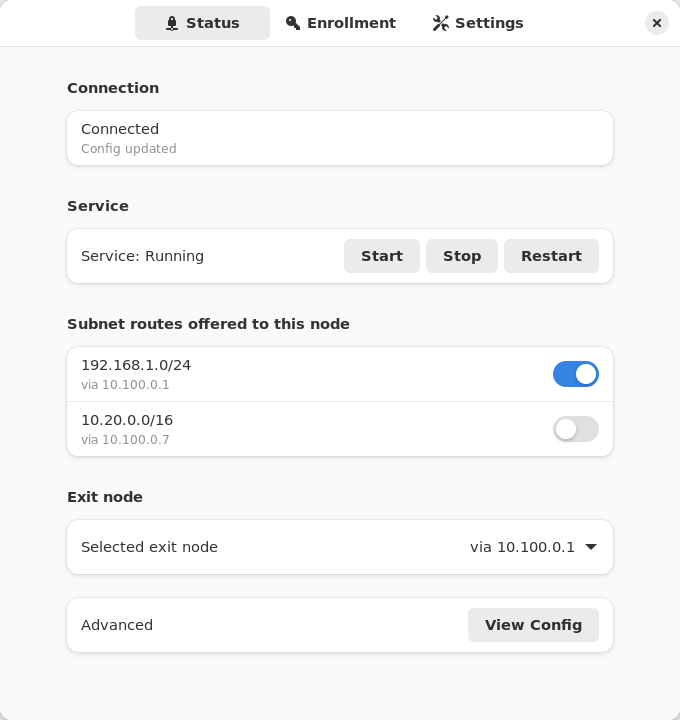
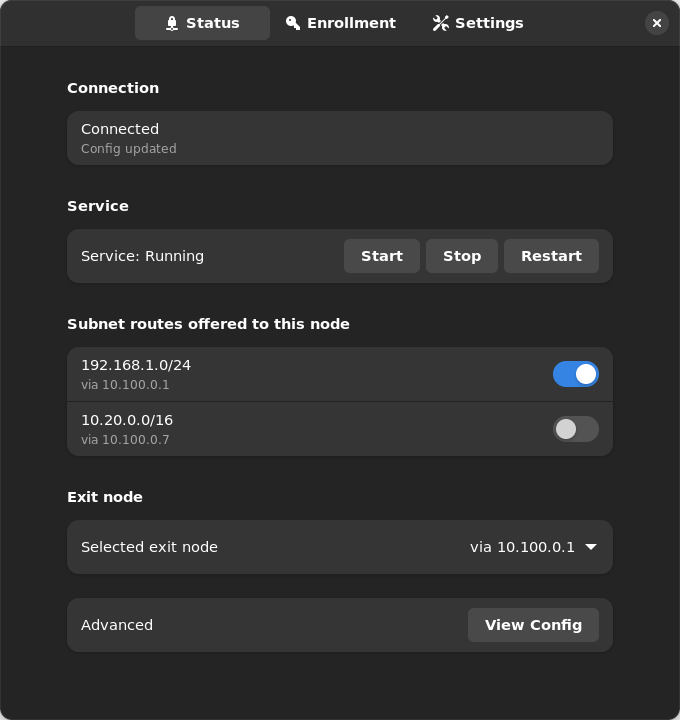
On Linux, three packages give you a GTK4/libadwaita desktop app plus a background systemd service that does the actual work - no group membership or relogin needed, and no admin/root prompt for enrolling, starting/stopping, or accepting routes.
| Light | Dark |
|---|
 |  |
What’s included:
- nebula-commander-client – The
ncclient CLI (frozen binary, no Python runtime needed). - nebula-commander-service – Installs
ncclient.service (systemd), which polls for config/certs and runs Nebula as root. Exposes a system D-Bus API (org.beardedtek.NebulaCommander1) that the desktop app talks to, authorized per-call via polkit for any active local session. - nebula-commander-desktop – The GTK4 app: enroll, view connection/service status, and accept or reject offered subnet routes and exit nodes.
Because authorization goes through polkit (allow_active=yes) instead of Unix group membership, the desktop app works immediately after install and login - there is no usermod/relogin step like older group-based designs.
Package repository (recommended)
Add the signed Nebula Commander repository once, and new releases arrive with your normal system updates (apt upgrade, dnf upgrade, zypper update). It carries the current and the previous few releases, for amd64 and arm64. Installing nebula-commander-desktop and nebula-commander-service pulls in nebula-commander-client.
Debian / Ubuntu:
sudo apt install -y curl
sudo install -d -m 0755 /etc/apt/keyrings
sudo curl -fsSL -o /etc/apt/keyrings/nebula-commander.asc https://pkgs.nebulacommander.com/gpg.key
sudo curl -fsSL -o /etc/apt/sources.list.d/nebula-commander.sources https://pkgs.nebulacommander.com/deb/nebula-commander.sources
sudo apt update
sudo apt install nebula-commander-desktop nebula-commander-service
Fedora / RHEL:
sudo curl -fsSL -o /etc/yum.repos.d/nebula-commander.repo https://pkgs.nebulacommander.com/rpm/nebula-commander.repo
sudo dnf install nebula-commander-desktop nebula-commander-service
openSUSE:
sudo zypper addrepo https://pkgs.nebulacommander.com/rpm/nebula-commander.repo
sudo zypper install nebula-commander-desktop nebula-commander-service
On a server without a desktop, install just nebula-commander-service. The repository metadata and the RPMs are signed with the key at pkgs.nebulacommander.com/gpg.key.
The packages below can also be installed directly, without adding the repository.
.deb (Debian, Ubuntu, and derivatives)
Download all three packages from the Client Download page or GitHub Releases, then install together so apt resolves the dependency order:
sudo apt install ./nebula-commander-client.deb ./nebula-commander-service.deb ./nebula-commander-desktop.deb
.rpm (Fedora, RHEL, and derivatives)
sudo dnf install ./nebula-commander-client.rpm ./nebula-commander-service.rpm ./nebula-commander-desktop.rpm
On openSUSE, use zypper instead:
sudo zypper install ./nebula-commander-*.rpm
Flatpak
The desktop app is also available as a Flatpak bundle. It is not yet published on Flathub, so install the bundle directly:
flatpak install --user ./org.beardedtek.NebulaCommander.flatpak
The Flatpak is the GUI only - it still needs nebula-commander-service (or an equivalent backend, such as the NixOS module) installed and running separately, since a sandboxed Flatpak cannot run Nebula or create a TUN device itself.
After install
- Open Nebula Commander from your application launcher.
- Go to the Enrollment tab and enter the server URL and the one-time code from Nebula Commander (Nodes → open the node → Enroll).
- The Status tab shows connection/service state and lets you start/stop/restart the service, view the generated
config.yaml, and accept or reject offered subnet routes and exit nodes.
See ncclient usage for the equivalent CLI-only steps, or Development: Manual builds to build these packages yourself.
4 - Windows Installer
On Windows the MSI installer sets up the ncclient CLI, a native windowed app, and a background Windows Service that does the actual work as LocalSystem - no UAC prompts for enrolling, starting/stopping, or applying split-horizon DNS.
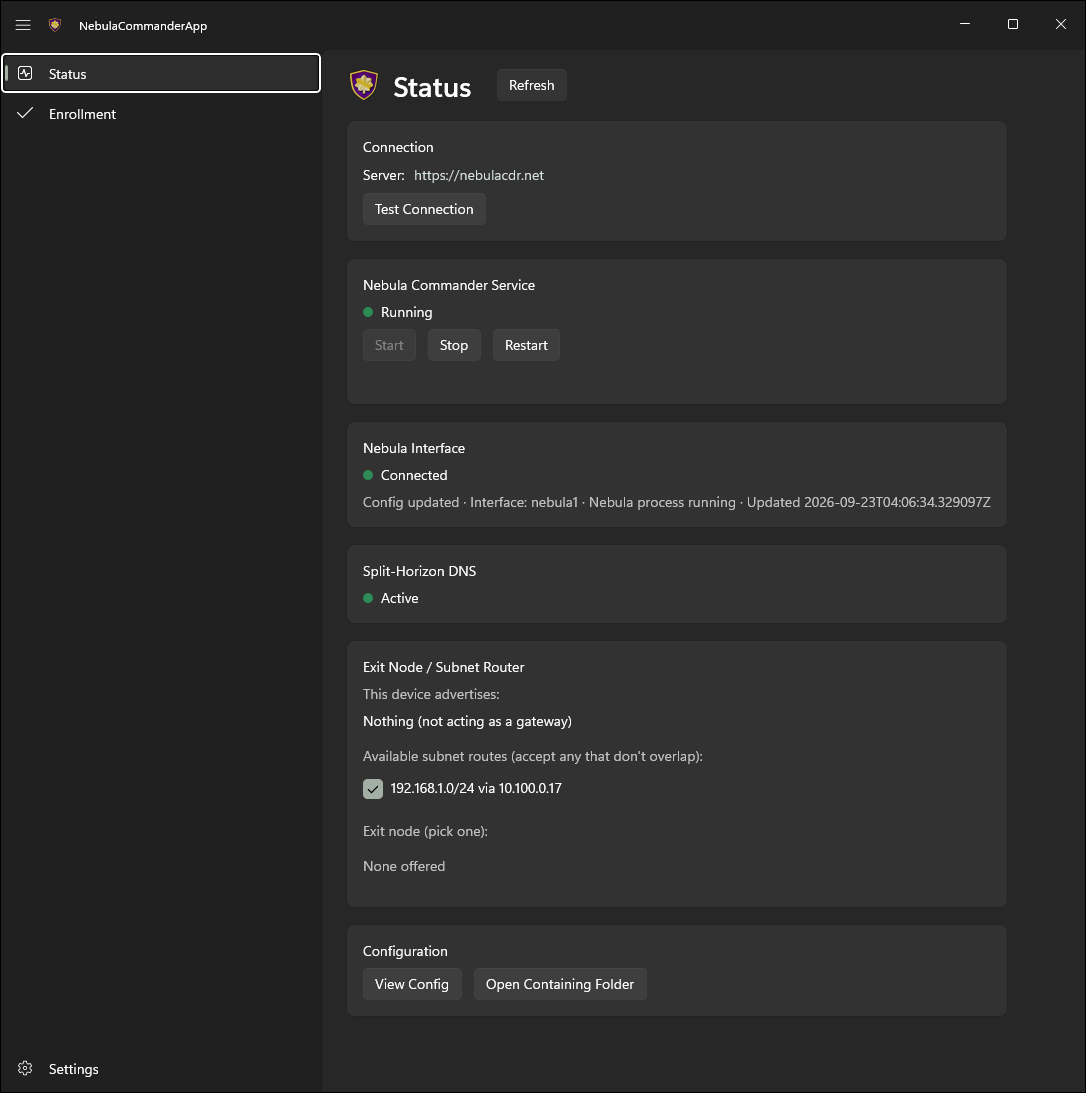
What the installer includes:
- ncclient – CLI for enrollment and daemon (poll for config/certs, run or restart Nebula).
- Nebula Commander (WinUI 3) – The windowed desktop app: side tabs for Status, Enrollment, and Settings, minimizes to the tray on close. Talks to the background service.
- ncclient-service – The
NebulaCommanderService Windows Service that polls for config/certs and runs Nebula as LocalSystem. Starts automatically at boot; the app talks to it over a local named pipe.
All three are installed to %ProgramFiles%\Nebula Commander\. The installer can add that directory to PATH, creates Start Menu shortcuts, and registers/starts the service.
Getting the installer:
- Download
NebulaCommander-windows-amd64.msi from the GitHub Releases page for the version you want. - Use
SHA256SUMS.txt in the same release to verify the file.
After install:
- Open Nebula Commander from the Start Menu and use the Enrollment tab: paste the server URL and the one-time code from Nebula Commander (Nodes → open the node → Enroll). This is the recommended way to enroll after an MSI install - it writes the token where the service reads it (
%ProgramData%\nebula-commander\) and immediately notifies the service to fetch config. (The CLI’s ncclient enroll writes to a separate per-user location the service does not read from, so avoid it for MSI installs unless you’ve explicitly redirected NEBULA_COMMANDER_CONFIG_DIR.) - The service starts polling automatically once enrolled - nothing else to run. Use the app’s Start/Stop/Restart Service controls on the Status tab, and Settings to change server URL, poll interval, or enable split-horizon DNS. See Windows App in Usage for details.
For building the MSI yourself, see Development: Manual builds.
5 - NixOS
A services.ncclient module runs ncclient declaratively as a systemd service — an alternative to the Docker image, the Windows service, or a hand-written unit (see Install service in Usage). It’s exposed by the same flake.nix as the server module, as nixosModules.client.
{
  inputs.nebula-commander.url = "github:NixRTR/nebula-commander";

  outputs = { self, nixpkgs, nebula-commander, ... }: {
    nixosConfigurations.yourHost = nixpkgs.lib.nixosSystem {
      system = "x86_64-linux";
      modules = [
        ./configuration.nix
        nebula-commander.nixosModules.client
      ];
    };
  };
}
Or import nix/client-module.nix directly by path if you’re not using a flake, the same way the server module can be.
services.ncclient = {
  enable = true;
  server = "https://nebula.example.com";
  # One-time enrollment: a file holding the enrollment code, consumed once (the
  # unit only runs `ncclient enroll` when no token exists yet at stateDir/token).
  enrollCodeFile = "/run/secrets/ncclient-enroll-code";
  acceptDns = true;
};
Then rebuild: nixos-rebuild switch (path-based) or nixos-rebuild switch --flake .#yourHost.
| Option | Type | Default | Description |
|---|
enable | bool | — | Enable the ncclient service |
package | package | built from nix/client-package.nix | The ncclient package |
nebulaPackage | package | pkgs.nebula | Package providing the nebula/nebula-cert binaries ncclient orchestrates |
server | string | — (required) | Nebula Commander server URL |
enrollCodeFile | null or path | null | Path to a file containing a one-time enrollment code. When set and no token exists yet, a oneshot unit runs ncclient enroll before the main service starts. Leave null if you provision the token file out of band. |
interval | int | 60 | Poll interval in seconds |
outputDir | string | /var/lib/ncclient/nebula | Directory ncclient writes Nebula’s config/certs/binary to |
acceptDns | bool | false | Accept and apply DNS settings pushed by Nebula Commander |
stateDir | string | /var/lib/ncclient | Directory holding the device token and settings.json together on the same persistent path — both must live in the same place or the node’s identity is lost on restart even though the token survives |
The service runs as root, matching the Windows Service (LocalSystem) and Docker image (root-in-container) precedent above — Nebula needs to create a TUN device. --nebula/--restart-service are intentionally not exposed; nebula is resolved via PATH (from nebulaPackage), matching the Docker image’s approach.
Desktop app
On a NixOS desktop, you can add the Linux desktop app alongside the service with the nixosModules.client-desktop module (or nix/client-desktop-module.nix by path):
modules = [
  ./configuration.nix
  nebula-commander.nixosModules.client
  nebula-commander.nixosModules.client-desktop
];
services.ncclient.enable = true;          # the service the app controls
services.ncclient-desktop.enable = true;  # adds "Nebula Commander" to the app launcher
| Option | Type | Default | Description |
|---|
enable | bool | — | Install the Nebula Commander desktop app (GTK4/libadwaita) |
package | package | built from nix/client-desktop-package.nix | The desktop app package |
The desktop module only installs the app. services.ncclient already registers the D-Bus policy and polkit rules the app needs, so any user in an active local session can enroll, change settings, accept routes, and start/stop/restart ncclient.service without a password prompt or group membership.
6 - Pip (PyPI)
Fallback method when Docker, binaries, or NixOS are not suitable (e.g. no Docker, or you need to run from source).
From PyPI:
pip install nebula-commander
Requires Python 3.10+. This installs the ncclient command.
From source (repo clone):
cd nebula-commander
pip install -r client/requirements.txt
Then run as python -m client --server URL enroll --code XXX, or install the client in development mode to get the ncclient command:
cd client
pip install -e .